Chapter 8: Requirements Elicitation
Contents
Chapter 8: Requirements Elicitation
Successful products are those that meet the needs of the client and can be easily adopted by the target user. Building a successful product can be difficult if teams do not understand the core business need of the product itself.
The purpose of this section is to understand more about requirements elicitation, the broad spectrum of tasks involved to help teams derive their requirements. By the end of this, you should understand what artefacts are used to represent the project specifications.
What Are Requirements?
Before we look at how requirements elicitation works, let us consider what requirements are. Broadly speaking, requirements define what teams need to implement. There are three key types of requirements that are used in software projects:
Functional requirements: These stipulate what the system should do. The Agile Scrum framework expresses functional requirements as user stories.
Non-functional requirements: These requirements detail any additional constraints that specify how a system should behave. Some examples include any safety, security, or performance requirements.
Emotional requirements: Requirements that detail how the target user should feel when interacting with the system.
Why Do We Need to Perform Requirements Elicitation?
Teams are provided with a high-level project brief and are tasked with extracting the project requirements. Requirements elicitation helps teams understand what these requirements are, whilst also building a strong understanding of the project and why it is needed.
Requirements are important as they provide teams with a clear set of features that the team will work to complete. It is also a clear way of demonstrating to the client, what capabilities will be delivered.
A strong understanding of the business need is equally important. As clients may often not know exactly what they want, a strong understanding of the project is important. When teams can understand what the key frustrations are, they are well positioned to come up with solutions that successfully solve the client’s pain points.
The process of requirements engineering, which is simply all the activities required to have your detailed specifications, are discussed below.
0. Background Research
Before you speak to your client, you should develop a general understanding of the project to aid your team in directing the meeting and forming helpful questions. For example, a previous year was tasked with building a personal CRM for clients. It was important for all students to have a good understanding of what a CRM was prior to the initial meeting.
Additionally, teams will benefit from finding competitors within the problem domain, to look for potential functionality that the client may want. Understanding the client’s competitors, peers, etc. will save the client work in having to explain all facets of their business and industry to your team.
1. Initial Client Meeting and Elicitation
Client Meeting
The first client meeting is your chance to understand more about your client, the project, and their expectations. During this meeting, teams should try to establish a basic understanding of the problem. Understanding what is wrong or missing with the current system (system as is) is critical in making sure that you build a product that can solve these frustrations/problems. If possible, teams should also clarify exactly what is expected from the product: who will use this, should the product be a mobile application or website, what other preferences should be considered.
Make sure to schedule the meeting in advance and prepare an agenda of questions you would like to ask ahead of time. Emailing your client with the agenda can be beneficial to ensure they are prepared. The meeting itself should have a facilitator and note taker assigned ahead of time, with team members jumping in as required.
Elicitation
Following your initial meeting, the team should work through the meeting minutes to extract the key requirements. Teams should work to extract the user goals - the objectives the target user of the system would want to achieve. These correlate to user stories, an agile way of representing requirements (see Agile methodology). Additionally, while you are in the process of reaching this shared understanding of what should be achieved, teams should also clearly look to define what the scope is. If there were any features or functionality mentioned earlier by the client, that cannot be feasibly achieved, then these should be clearly identified.
The process of writing your requirements can be done by different methods.
Motivational Modelling
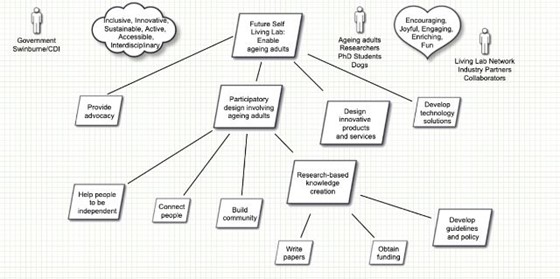
One popular technique is to use motivational modelling. This technique allows the functional, non-functional, and emotional goals of the system to represented in a diagram. The benefit is that diagrams are often easier to read compared to written requirements, and emotional requirements are also considered.
Motivational modelling is done through brainstorming a list of the key requirements of the system and stakeholders involved. The list is called a DO/BE/FEEL/WHO list, and should detail:
DO: what your system can do? (Functional goals)
BE: how your system should behave? (Non-functional goals)
FEEL: how users should feel when using the system? (Emotional goals)
WHO: key stakeholders
This list is then converted into a hierarchical diagram, as shown below. This is a great starting point for teams to confirm the understanding of the project requirements, with the bottom leaves corresponding to user stories.
Extra Resources
You can visis the appendix for more information on how to use the university’s supplied motivational modeller. If you wish to use a different tool, here are a few:
Tool |
|---|
2. Elaboration
Once the general user goals are understood, teams should work to expand and refine the information collected. This typically involves:
Verifying the motivational model is consistent with the clients understanding and expanding as required.
Developing personas to match your target users.
Developing prototypes.
Personas
Personas refer to fictional characters that represent the different types of users that may use your product. They play a key role in helping teams empathise and understand the users of the product, through using the persona to establish whether certain design decisions are correct.
To understand the power of a persona, consider buying a car. Different people buy cars for different reasons. Some people are looking for a large, reliable car for transporting their families whereas other people look for fast and luxurious cars to fit their lifestyles. If you had to design a car for a person, it is important to understand which category your client falls in, to make sure the car you design is suited to their purpose. This is how personas can be useful.
Source: 99Designs
It might seem weird to use fictional characters but using real people (like your client, a team member, etc.) could result in data privacy breaches, as well as unrealistic use cases, if they are not well aligned to actual user requirements.
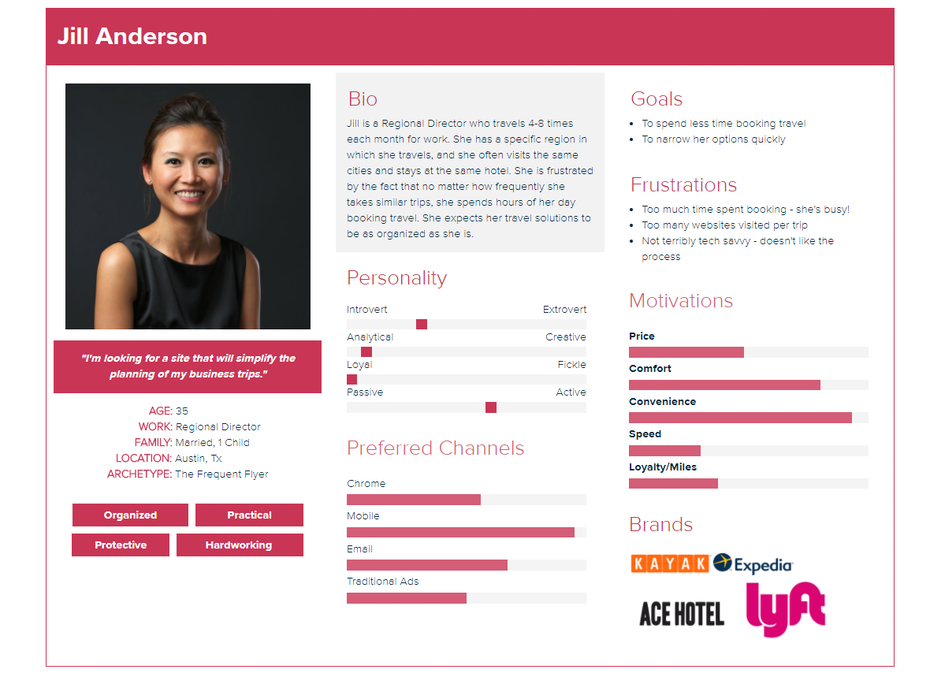
Writing Personas
A persona should have the following elements:
Fictional name.
Job title/responsibilities.
Demographics (age, education).
Goals and tasks they are trying to achieve.
Any frustrations.
Below is a list of popular tools for making personas:
Diversity and Inclusion
Personas should also be diverse in demographics and backgrounds (age, ethnicity, education, etc.) to capture real-life users. Why is that important?
Firstly, it will help us gain a better understanding of our target end-users. Secondly, it is crucial for us to recognise diversity in people and create an inclusive environment together in every aspect of our lives. It is not just the way we treat other people, but also the work we produce. Persona is one example.
Let us think about a couple of examples for Personas. The system we are designing is for the engineering workforce of which 13.6% are female (Women in Engineering report). Do you think we recognise the diversity of our target end-users and are being inclusive, if all the personas we create are male? No, we are not. What if the system-to-be is for nurses and midwives where 11.3% are male (Factsheet, Nursing and Midwifery 2019)?
Another example, our project is to re-design the user interface of our client’s website. Our client tells us that 80% of the end-users are female. Therefore, in our female personas we said that they like pink. In fact, our team is going to design the interface to be pink. Do you think we have recognised the diversity of our end-users? Do all women like pink? We encourage you to be mindful of stereotypes. Design decision should be made after you have thoroughly considered different factors (e.g. What’s the goal of the website? How do we want our users to feel when they interact with it? Does our client’s company have a colour scheme in their existing design that the new website should be consistent with?) rather than solely relying on our prior beliefs or stereotypes.
The examples we give above are related to gender. Diversity can take on many other forms, such as ethnicity, education background, age and so on. We strongly encourage you to create personas that cover the diverse demographics and backgrounds of your target end-users.
9 Consistency Principles
It is really important that the user stories, personas and motivational model are consistent with each other, following the 9 principles (CP stands for Consistency Principle):
CP1: There should be at least one persona for every role in the motivational model.
CP2: Every persona should relate to a role in the motivational model.
CP3: The grouping of user stories into epics should be reflected in the motivational models.
CP4: Every user story needs to relate to one of the nodes in the model.
CP5: There should be at least one user story for every leaf node in the motivational model.
CP6: There should be at least one user story for every quality goal.
CP7: Every quality goal occurring within a user story should appear in the motivational model.
CP8: There should be at least one user story for every emotional goal.
CP9: Every emotional goal occurring within a user story should appear in the motivational model.
The natural question to ask is why is it so important that we make sure these artefacts consistent with one another. Firstly, software development teams are increasingly multidisciplinary due to the expansion of application domains where software is essential. The increase in disciplines places greater demands on communication as less knowledge can be assumed. Both technical and non-technical team members are able – and often expected – to contribute to ongoing discussions and decisions about requirements. Given the challenges, we need to create requirements artefacts that are understandable to non-technical users, easily understood by developers, and are consistent with each other in order to improve communication between software developers and industry partners.
Personas and user stories can be used to specify customer requirements. A persona is a description of an archetypal user of a software system, created from research about the potential real users of the software system. A user story statement should relate to both a persona and a goal. A goal is an intended outcome of a persona interacting with a software system. Personas provide the rationale for the existence of user stories. The success of software products is highly dependent on validations performed on users’ goals. The relationships between personas, user stories and goals are critical.
Motivational models present a hierarchical diagram of the goals of a system at a high level of abstraction. They complement personas and user stories which focus more on user needs rather than on system features. The 9 consistency principles help us ensure that personas, user stories and motivational models are consistent with each other, ultimately achieving a better understanding of the requirements among stakeholders.
Prototypes
Coding a system can be complex, and time-consuming. If your client realises they do not like the design of the system, or perhaps some interface needs to be reworked, doing this on the actual system can be incredibly time-consuming. Like many projects, one of the key constraints of your project is time. As a result, simply coding the system after deriving your requirements increases the risk of having to make major changes to the system midway.
Prototypes provide a solution to this problem. Teams can build a prototype, a hand drawn or digital mock system that resembles what the final product should look or behave like. These are much quicker to build and allow teams to get feedback from the client much earlier, reducing the likelihood of major changes to the system’s interface later.
Classes of Prototypes
Paper prototype/Low fidelity prototype: Hand drawing of user interface to allow it to be rapidly designed, simulated, and tested. These are typically black and white and don’t consider choices such as colour palette, font, and general styling.
High fidelity prototype: A digital prototype that looks very similar to what the final product should look like. These prototypes are made using no-code programs and should determine the final design of the system.
Building a Low Fidelity Prototype
There are many tools that can be used for creating low fidelity prototypes:
Microsoft PowerPoint: While sometimes slow and cumbersome, PowerPoint comes complete with several good features for drawing and designing UI elements.
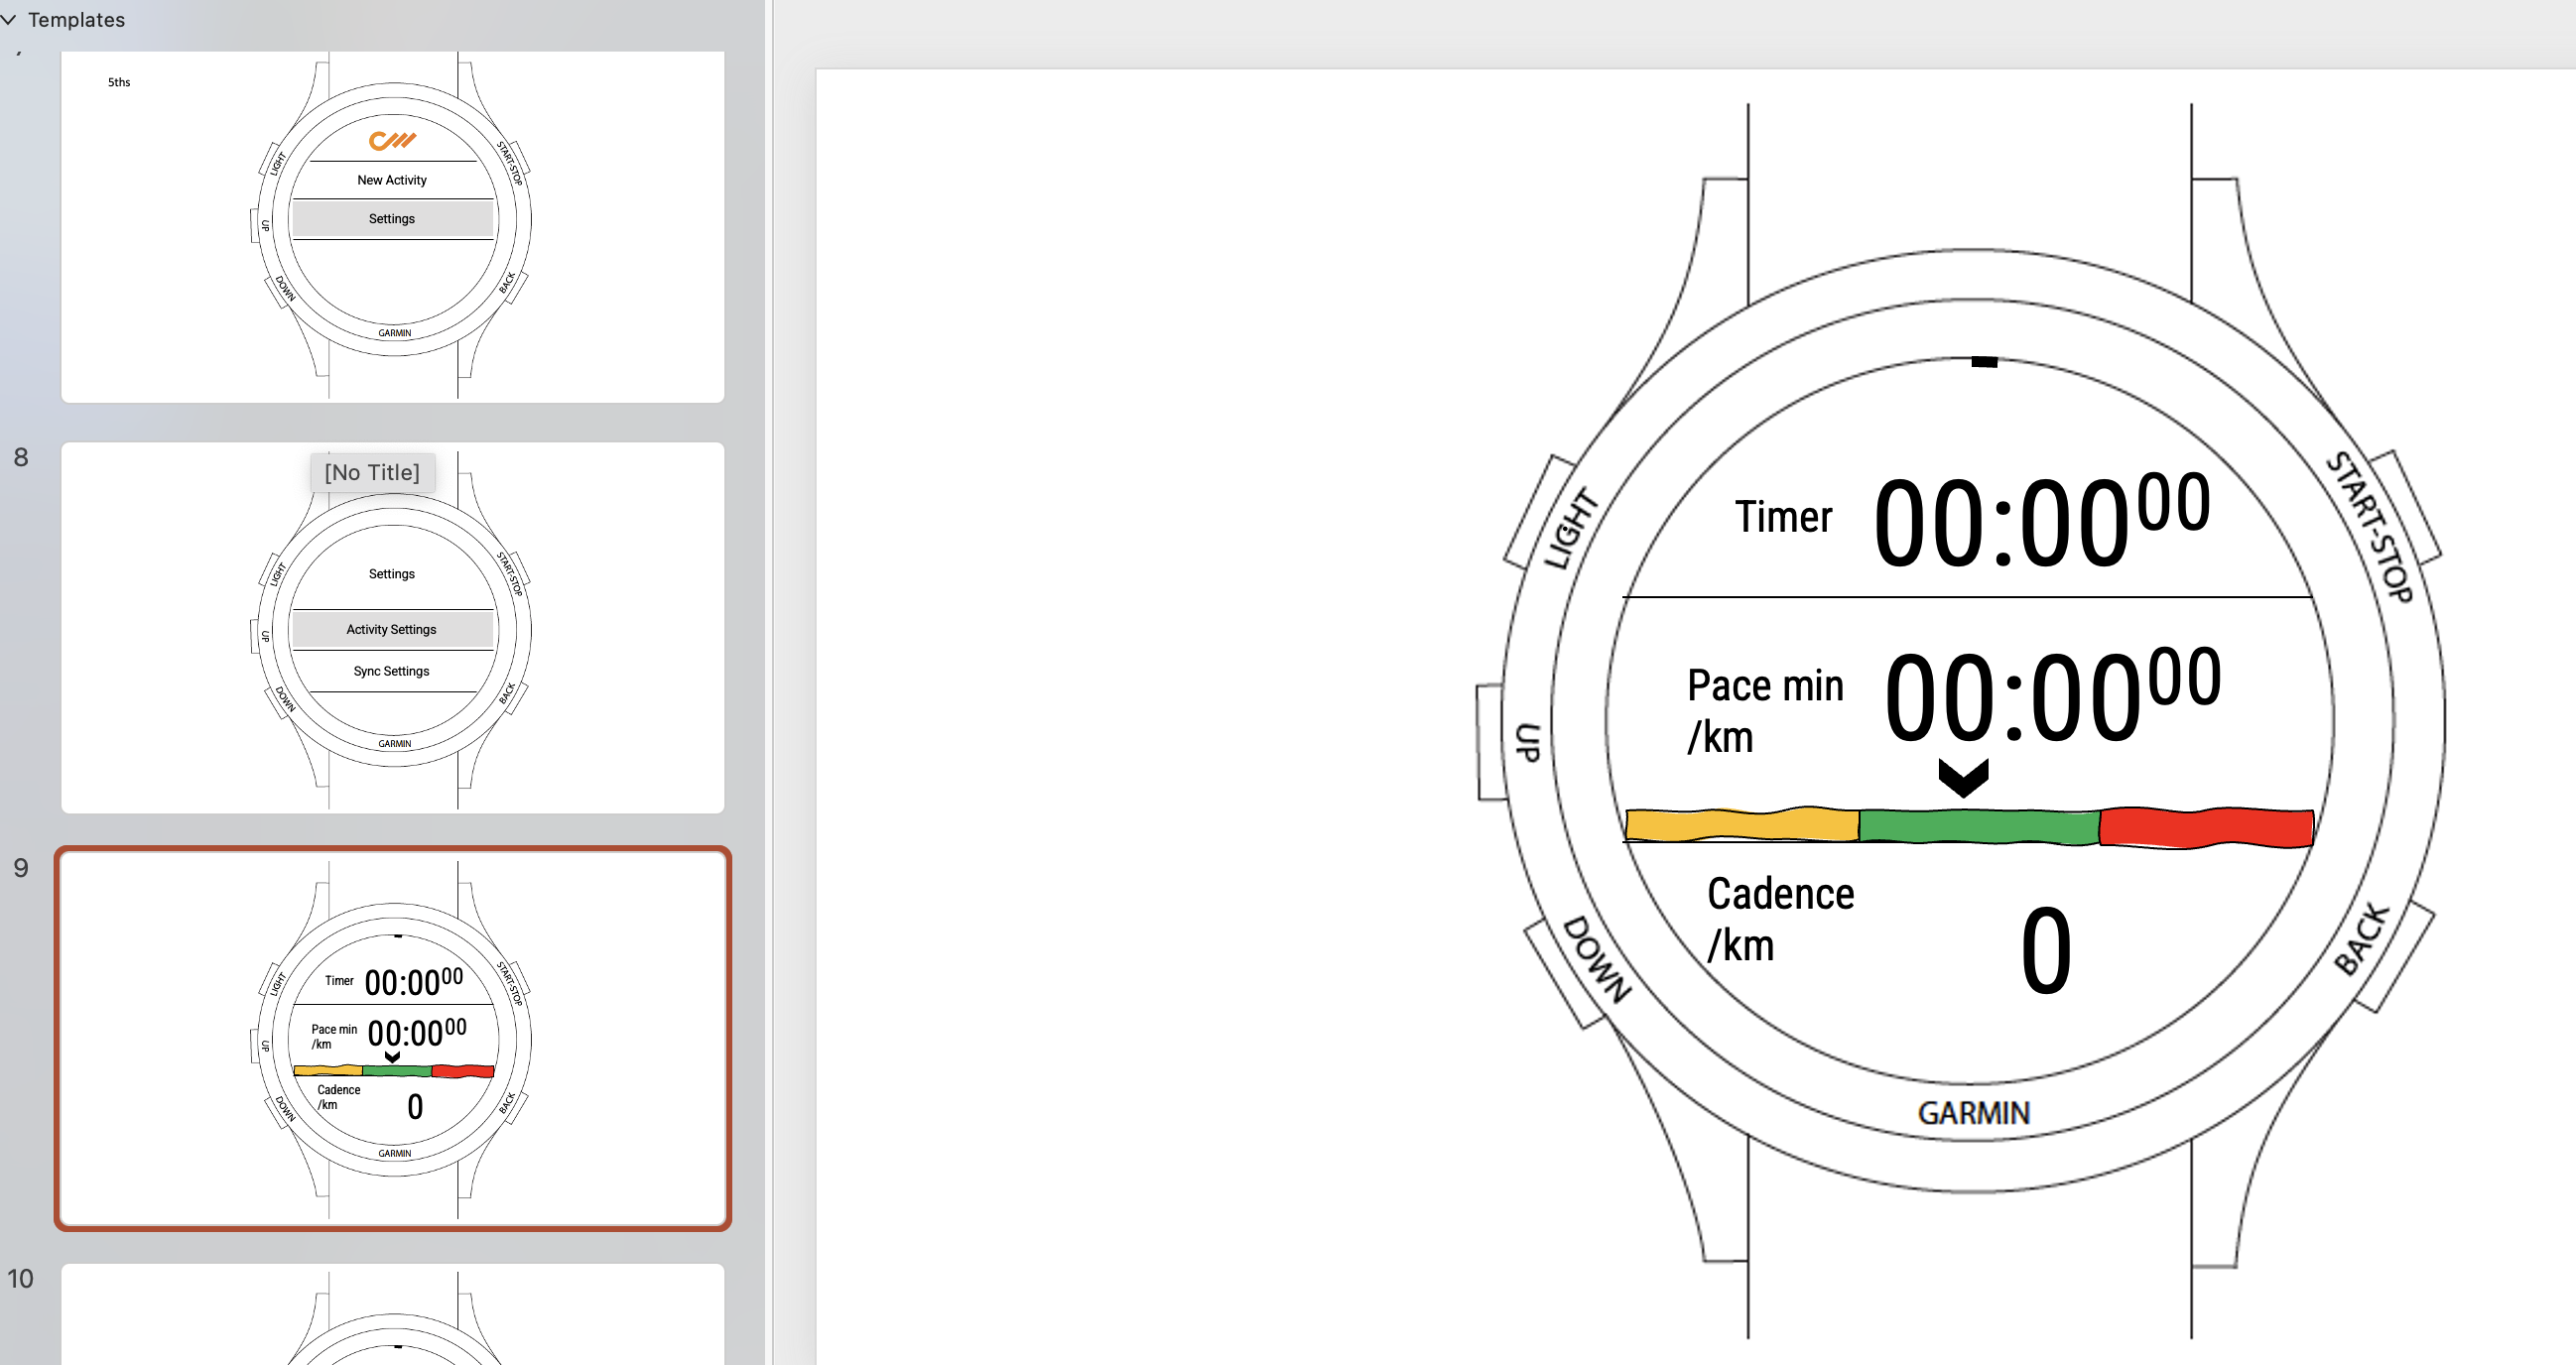 This is an example of a watch UI
created through PowerPoint. User interaction elements can be
created, and a user scenario was created to take the client through
during a meeting.
This is an example of a watch UI
created through PowerPoint. User interaction elements can be
created, and a user scenario was created to take the client through
during a meeting.Miro can also be used to quickly create wireframes using their templates: Miro wireframe templates
Marvel: Please see the appendix for a tutorial.
Building a High-Fidelity Prototype
The benefit of using a high-fidelity prototype vs. a low fidelity prototype is it allows development teams to be much more specific about how a product will look, feel, and act without having to code it (which can be very time-consuming). High fidelity prototypes also allow for greater interactivity - it can be demonstrated to the client and other users, and they can interact with the prototype to click buttons, menus, view page transitions, etc. to gain a much better idea of how the final product will behave. This is a great way of eliciting very specific feedback from the client on the placement of buttons, uses of colours, etc.
There are many tools that can be used for creating high-fidelity prototypes:
Figma: One of the most used tools professionally (and they offer a free student version).
Axure: Fully featured with a steep learning curve, but probably worth it if you wish to pursue UI design professionally (and they also offer a free student version).
Adobe XD: Far less fully featured but integrates well with other Adobe products. They also offer student discounts for their full suite of products.
3. Negotiation, Validation, and Specification
As the various requirements artefacts are developed, teams should be validating these with the client. If there is some disagreement between what the team believes is achievable and what the client wants, teams are required to negotiate and reconcile any differences. In extreme cases where a resolution cannot be reached, speak to your supervisor.
Running usability tests with your client is the easiest way to validate the requirements your team has created. First, a team should create tasks that can be completed using the prototypes - these tasks will represent the full set or a subset of the user stories. For example, if a user story is that a user logs in and views their purchase, the high-fidelity prototype should permit users to simulate this user story. It should have a success narrative and all other narratives should be failures.
If a user can successfully log in and view their purchase history, this is the success narrative. If they cannot, the task has been failed.
Once these tasks have been created, your team should contact the client to organise a meeting to conduct testing. Your team should assign a test facilitator whose job it is to ask the participant (your client) to perform the tasks your team has created. While the participant completes each task, the facilitator observes the participant’s behaviour and listens for feedback.
A minute taker should be assigned to note down feedback - all feedback should be welcomed from the client for things as small as the colour of a button. The more feedback you can elicit at this stage, the more time it will save you later when you have to make much more time-consuming changes to code.
One tool that can automate this process for you is Maze. These tools typically exist with all high-fidelity prototypes listed above.
Finally, once all your requirements have been finalised and the client is happy with them, you will have your set of specifications. This should include:
User stories.
Motivational model.
Personas.
Prototypes.
Extra Resources
What’s Next
Now that your team has elicited the requirements - it is time to start designing the application.